Pre-tabbed battery guide
Category: GuidePosted by Fallingwater on 29 October 2011
DIY-ers often find themselves dealing with the problem of connecting cells and batteries to their creations. The standard way is to use a holder, but if your cell choice is not something you can find in the department store - if, for instance, you want to use 18650s - you're likely to find it hard to buy holders for them. Holders also present a rather high resistance, which isn't a problem for low-power applications, but tends to become one when you're pulling several amps from the cells and the springs start to smoke and melt the holder itself.
The ghetto way of solving this problem is to solder the wires straight to the cells, but a more elegant way would be a good thing, especially since cells don't particularly like the heat from soldering irons. Doing it properly requires using pre-tabbed cells; sadly, they tend to be expensive, because tiny amounts of them are not in high demand (tabbed cells are usually bought by factories looking to make production runs of thousands of packs) and so only specialty dealers carry them.
There is, however, a solution; it involves - of course - some hardware hacking, but it leaves you with decent-quality cells at a low price.
Get yo' ass over to DealExtreme, and order as many as you need of these Trustfire protected 18650s (and then a pair more, just to be safe from DOAs). There are other protected 18650s on sale at DX, of several brands (hint: avoid Ultrafire cells), but trials on CandlePowerForums and general opinion of its members say these are the best. When they arrive, get them out of the shrinkwrap and prepare the following tools:
- a sharp knife (I use a paper cutter, but an x-acto or similar will do)
- a wooden or plastic toothpick
- small pliers
- a small pair of scissors; nail ones will do, but it's better if they're not curved
- electrical tape
- a soldering iron (optional but recommended)
A word of warning: Lithium-ion cells aren't like nickel- or lead-based ones; you can't short LiIon cells, go "aw shucks", remove the short and go on as if nothing happened. LiIons do not like shorting; by the time you notice the spark and/or heat and remove the short, cell damage is likely to have occurred already. And if you don't notice the short, you'd better hope the internal pressure protection works and disables the cell forever, otherwise you stand a good chance of facing a roaring lithium fire. For this reason, always have an empty metal container and enough sand to fill it; if a cell starts spontaneously heating up a lot and/or smoking, toss it in the container and throw the sand in. This is the only reliable way to kill a lithium fire. I'm told fine kitty litter works about as well as sand, by the way, but I've never had the pleasure of having to find out if it's true.
Also, if you think I'm assuming any kind of responsibility for what I'm explaining here, you're out of your mind - whatever actions you perform following this guide are your own responsibility, so if you burn down your house don't come complaining to me.
Now that the formalities are over, let's get down to business.
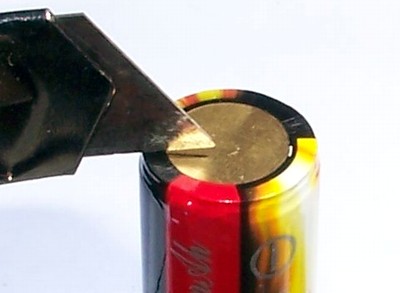
Turn the cell so you're looking at the negative terminal, then make a small cut on the plastic wrap - do not cut on the side of the cell, just on the terminal.
Lift up the part you've cut, then grab it with the pliers and pull it.
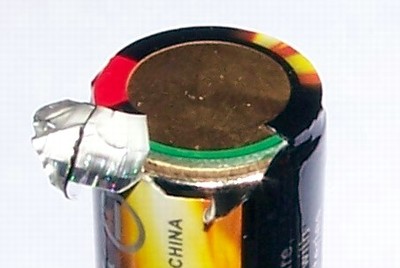
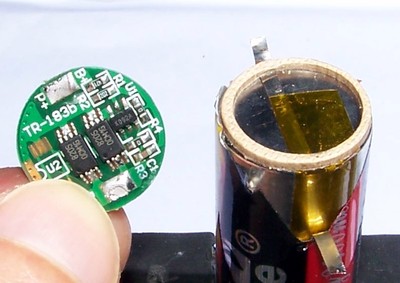
You want to get a nice ring of plastic wrap off the negative terminal so as to expose it entirely. Do not cut anywhere else than on the face of the terminal. You'll notice the circuit is connected to a metal strip that then goes down the side of the cell. Peel some of the plastic off the side of the cell where the strip is - it's easy to rip off once the first cut is made. In fact, be careful not to peel off too much of it.
Use the wooden toothpick to lift the metal strip off the cell as much as possible. Then, paying extreme attention not to touch anything other than the strip itself, use the scissors to cut it. Grab the end that goes down the side and bend it outward, so as to make sure it doesn't contact anything it shouldn't. Lift the protection circuit off the negative terminal.
Unsolder the other tab from it. You can also cut it, but as the negative tab is quite short, you probably want to preserve as much of it as possible. Dispose of the protection circuit (or keep it somewhere, it might come in handy someday).
Now keep in mind the following steps are to be done without cutting against the side of the cell, ever. The metal strip that carries the positive terminal to the protection circuit is only insulated from the negative body of the cell by a very thin plastic strip; if you cut through it you can create a short that is difficult to remove, which can result in sparks, fires, explosions and the summoning of Cthulhu.
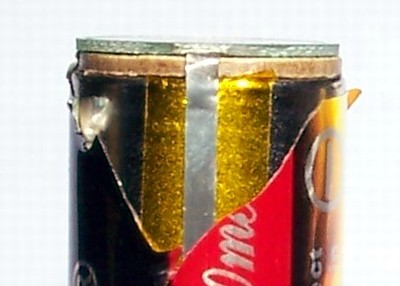
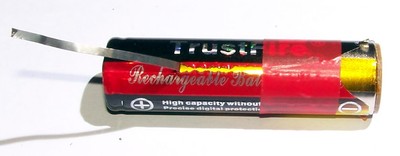
Grab the strip with the pliers and pull. It'll come off the cell splitting the plastic wrap as it goes in a weird wriggly way; do it for about two centimetres, then cut the wriggly plastic from the cut and put tape over it.
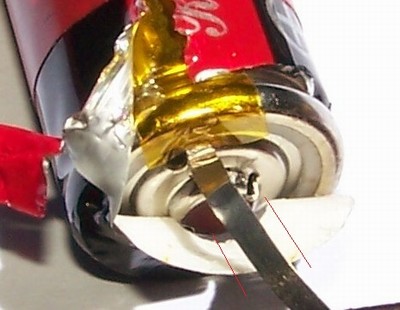
Keep pulling, cutting and taping until you're at the positive terminal (don't just pull it all the way through unless you're ready to re-wrap the cell with tape entirely); at this point, it will become necessary to remove a paper ring so you can pull the strip to its originating point.
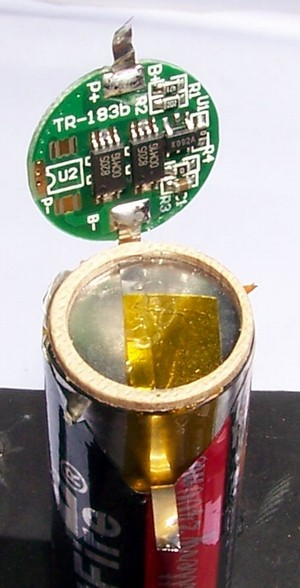
I suggest you don't remove the ring altogether, because it helps prevent shorts. For the same reason, don't remove the plastic strip that used to insulate the metal strip from the body. Cut a small section out of the ring where the strip is (along the red lines in the above picture) so you can put it back in place, then tape everything together. Pay attention (again) to avoid shorts: the inner plastic ring between the positive plate and the negative case is all that stands against one, and it's easy to bridge that small gap with a metal tool by mistake.
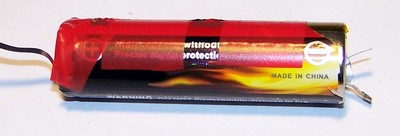
Cut the strip to a more manageable length (keep the leftover, as it makes for excellent electrical contact material).
Voila, you're done. The tabs are extremely easy to solder to, and won't come off easily. Have fun!
This process is doable in the same way for any cell that can be had with a protection circuit - 16340s (also known as RCR123, LIR123 and occasionally 17335), 14400s (AA-size), and there are even some protected 10440s.
No comments for this article
 Pre-tabbed battery guide