EeePC battery hack
How to improve the 701's battery life by 50%
Category: HackPosted by Fallingwater on 06 August 2011
Original article date: 2nd February 2009
I recently acquired a brand spanking new EeePC 701 4G to replace my aging Nec 900c as my on-the-go light-duty computing platform.
The 701 has been on the market for a while, and it's famous enough that a lot of people have written full reviews of it already, so mine will be very concise and to the point.
OMG IT'S AWESOME!!!!11
End review.
What? Told you it was gonna be concise.
I tested the 701's battery life by fully charging it and then running it until it was empty. I kept the screen on full brightness and left the wireless transceiver on (but I didn't use it much), and the EeePC lasted almost exactly two hours and a half before telling me that the battery was critical, and that I should save my job because it was gonna shut down in three minutes.
I imagine that turning the transceiver off and lowering the screen brightness to something like 5 (the slider has 15 positions, but the first four should be ignored as they're too dim to be useful if you're not in complete darkness) might get it to three hours, maybe a bit more.
Conversely, if you use it for heavy browsing and/or downloading the wifi transceiver will suck a lot more power, and the computer is likely to only barely get to two hours.
Your mileage may vary, especially since not all EeePCs have the same battery.
In any case, this isn't much when you consider that the 701 has a relatively tiny 7" screen, no hard drive and no CD-ROM drive.
There are other devices (such as the aforementioned Nec 900c) that run for longer on rather smaller batteries. But those aren't full-fledged computers; they use proprietary interfaces and components, their processors eat very little power but also have very unimpressive performance, and their embedded operating systems are computationally very light but not very versatile.
The 701 is not like that. It's an honest-to-goodness personal computer, with a Celeron processor, normal laptop components and capable of running normal operating systems (though it's really meant for optimized versions).
In other words, the current technology level allows you to have either compatibility and performance or superb battery life, and considering how horrible the experience of doing anything that required even very little CPU power was on the 900c (fifteen to twenty seconds to load Wikipedia...), I decided that decent performance was preferable.
There are ways of giving ridiculous runtimes to an EeePC with little hassle, but they require proportionally ridiculous batteries. The good news is that they aren't terribly expensive for what you get.
So if you really need monster runtime, head over to DealExtreme and get yo'self this eight-cell battery (white version here), or even this ten-cell behemoth (unavailable in white, so far as I can see). Users on the EeeUser boards have reported better gains in runtime than they expected, up to an incredible ten hours.
But I didn't need such extreme measures.
For starters, I need my on-the-go computer to be very portable. Carting around a brick of a netbook whose battery weighs more than the computer itself is not my idea of practicality.
I also don't want another battery. Getting another, bigger one in addition to the one I alraedy have would mean either carryng around and using both (impractical) or leaving one to slowly degrade while I use the other (wasteful).
More than anything, I don't need monster runtime. A battery that can run your netbook for ten hours straight is all well and good, but not once in my life have I lacked access to an electric outlet for so long.
(People who regularly take transoceanic flights need not write me to inform me of how useful they find their monster batteries).
What I needed was something like a 50% increase in runtime, so I could watch a full movie with 100% screen brightness during the two-and-a-half-hour-long train trip I routinely make, or do less intensive things for longer during the rare longer trip.
The stock battery of the EeePC is made up of four 18650 cells. Coincidentally, I had two bare 18650 cells in the refrigerator, waiting for me to find a use for them.
What? Don't you buy bare lithium-ion cells for no very good reason?
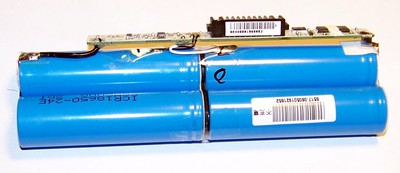
The four cells in the EeePC's battery are set in a 2s2p configuration: two pairs of parallel-connected cells, with each pair connected in series to the other. This lets the battery have twice the voltage and twice the capacity of a single cell.
Adding two cells is a simple matter of connecting them in parallel to the existing pairs, in order to get a 2s3p configuration (two series-connected groups of three parallel-connected cells each).
The tricky part is accomplishing this without ending up with a battery pack that impedes the computer's portability.
The first thing that needs to be done in order to modify a battery is, of course, to open it up. This is often harder than it sounds, because they are practically always held together by glue, not screws. Some brute force is needed to break the glue, but do it carelessly and you'll end up with a warped casing that never goes back together.
I tried to carefully push with a thin flathead screwdriver along the seams to get enough space to insert the screwdriver and lever them apart, but they were too tightly glued. So I broke out the Dremel with the metal saw attachment (a cutting disk would have worked just as well), and cut through one of the angles. Note that you should never do this on a flat part of the battery, otherwise you risk going too deep and nicking a cell. Doing it on an angle is much safer.
I then inserted a wide flathead screwdriver in the cut I obtained, twisted, and with a crack the glue gave. I then slowly and carefully worked with two screwdrivers along the seams, cracking the glue all around the battery, until finally the two halves came apart.
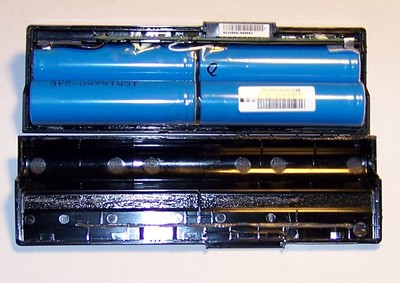
The cells inside were glued to the sides with weak adhesive tape; levering them out let me separate the innards of the battery from the casing.
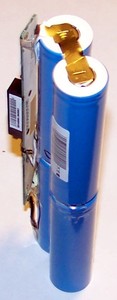
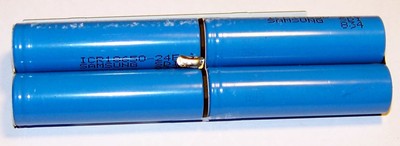
The two parallel-connected pairs of cells are joined by these two tabs at the positive and negative ends...
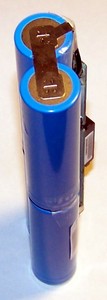
...and by this central tab, which does the series connection and also provides a balancing tap:
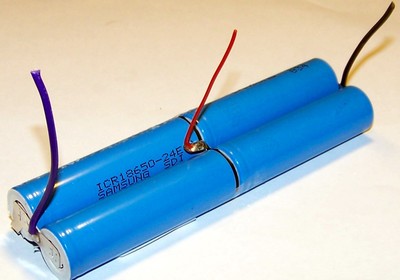
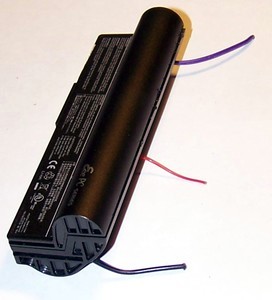
I soldered a wire to each connection between two cells. There's no need to solder straight to the cells; the tabs are much easier to solder to, so I just soldered the wires in their middle. The two main terminals need thicker wire than the balancing tap.
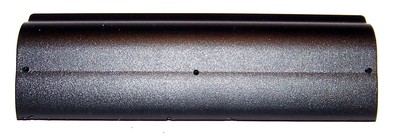
The next problem was to let these wires outside in such a way that they didn't foul up the insides of the battery, making it impossible to close it properly. To this end, I drilled three small holes in this fashion:
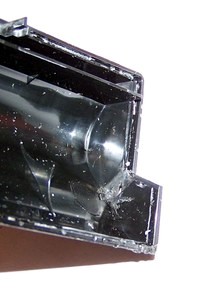
Note that the casing is too narrow for the wires; attempting to close it resulted in the wires getting squeezed and the casing never properly closing and looking as it was going to burst. To prevent this, I carved a passage for each wire in the sides of the casing with the dremel:
The plastic is very thin there, so it's possible to end up seeing on the other side. This is not a problem.
I threaded the wires through the holes, carefully inspected the two halves of the casing for bent tabs, plastic debris and/or leftover glue, and closed the battery. Some glue is needed to hold it together; cyanoacrilate or two-part epoxy (stronger) work well, but melt glue doesn't as it's ill suited for this task. I could have spread glue all along the seam, but I instead chose to only apply it in a few spots. This way if it ever becomes necessary to re-cell the battery I'll be able to open it back up without too much trouble. I then clamped the battery in my bench vise and let it sit there for a while to let the glue cure.
The battery was now ready to accept more cells. I put it in the EeePC and charged it to 100%; this was necessary to insure no voltage mismatch with the new cells.
I got my two 18650 cells, applied some solder to their terminals, charged them fully (important to avoid the charged cells in the battery to overload them) and then joined them in series with a short wire (I used the same wire size I used on the main terminals of the battery). I then cut and stripped some of the insulation in the middle of this wire to act as the balancing tap.
Next I glued the cells to the casing. The gluing process needs two stages; for now I just needed to set the cells in the correct position (low enough that they didn't foul the screen up, not so low that the computer rested on them) and keep them in place as I soldered the wires, so I used two dabs of melt glue on each end of each cell.
Once the glue was hardened and the cells were solidly in place, I trimmed the wires coming out of the battery, then stripped them. It's important not to screw this up: had I cut a wire too short it'd have caused me significant pain, as I'd have had to reopen the battery and resolder another wire or lengthen the existing one with another solder joint.
I soldered the end wires to the cell terminals, then insulated the connections with a layer of melt glue. I then soldered the balancing wire to the exposed part of the wire connecting the two new cells, tucked the connection down and drowned it in more melt glue.
I could just have used melt glue on everything, and it'd have probably worked acceptably well; however, since my EeePC gets thrown in bags and tossed around all the time, I wanted something more powerful. So I used silicone. Not any silicone will do, mind you; you need to look for the stuff that releases small amounts of acetic acid while curing (read the instructions on the tube to find out if it's the right one). I wanted to use transparent silicone, but since that wasn't available at the local store and the supermarket had a discount on grey one, I ended up using that.
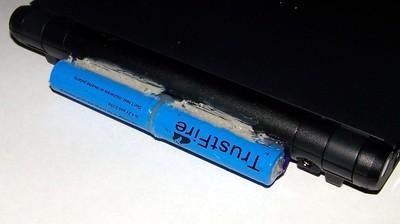
I made sure everything was clean, then (using a silicone tube gun) applied a generous amount of the stuff where the cells contact the plastic. Silicone has a curing time of several hours at least, but it's preferable to leave siliconated parts alone for a whole day before using them. I gave the silicone ample time to do its thing.
The result is, while not aesthetically pleasing, functional and quite tough.
With this mod I achieved the desired result: the EeePC genuinely does last about 50% longer (I don't have the patience to take proper stopwatch tests), it's not much heavier and the expense was risible. The only weird thing I've noticed is that sometimes if I charge it fully and then immediately use it, it'll report a battery status of 90%. I can only assume that the status circuitry inside the battery gets a bit confused by the added capacity and doesn't report the charge level with complete reliability. This does not affect runtimes, so I consider it a very minor inconvenience.
And as for toughness, well, three days after completing the mod I was fumbling around with something while holding the EeePC and I dropped it from chest height on a concrete floor. It hit exactly on one of the new cells. The fall didn't dent the cell itself: the impact was absorbed by the silicone, and the only thing that broke was some of the outer sleeve on the cell in question. A small bit of electrical tape fixed it, and the computer has been running fine ever since. It's also perfectly possible to grab it by the battery with no trouble at all.
If you're in the position of wanting a longer lasting EeePC without having to deal with multiple batteries, I heartily recommend you do this too. It's almost certainly doable even on the batteries of the later models (incompatible with the 701's), as the technique is exactly the same.
I recently acquired a brand spanking new EeePC 701 4G to replace my aging Nec 900c as my on-the-go light-duty computing platform.
The 701 has been on the market for a while, and it's famous enough that a lot of people have written full reviews of it already, so mine will be very concise and to the point.
Review
OMG IT'S AWESOME!!!!11
End review.
What? Told you it was gonna be concise.
The battery
I tested the 701's battery life by fully charging it and then running it until it was empty. I kept the screen on full brightness and left the wireless transceiver on (but I didn't use it much), and the EeePC lasted almost exactly two hours and a half before telling me that the battery was critical, and that I should save my job because it was gonna shut down in three minutes.
I imagine that turning the transceiver off and lowering the screen brightness to something like 5 (the slider has 15 positions, but the first four should be ignored as they're too dim to be useful if you're not in complete darkness) might get it to three hours, maybe a bit more.
Conversely, if you use it for heavy browsing and/or downloading the wifi transceiver will suck a lot more power, and the computer is likely to only barely get to two hours.
Your mileage may vary, especially since not all EeePCs have the same battery.
In any case, this isn't much when you consider that the 701 has a relatively tiny 7" screen, no hard drive and no CD-ROM drive.
There are other devices (such as the aforementioned Nec 900c) that run for longer on rather smaller batteries. But those aren't full-fledged computers; they use proprietary interfaces and components, their processors eat very little power but also have very unimpressive performance, and their embedded operating systems are computationally very light but not very versatile.
The 701 is not like that. It's an honest-to-goodness personal computer, with a Celeron processor, normal laptop components and capable of running normal operating systems (though it's really meant for optimized versions).
Some newer EeePC models, such as the 901, use the Atom, a low-power processor meant explicitly for ultra-mobile devices that's supposed to give better battery life without sacrificing too much performance. The 901, however, costs about twice as much as the 701.
In other words, the current technology level allows you to have either compatibility and performance or superb battery life, and considering how horrible the experience of doing anything that required even very little CPU power was on the 900c (fifteen to twenty seconds to load Wikipedia...), I decided that decent performance was preferable.
There are ways of giving ridiculous runtimes to an EeePC with little hassle, but they require proportionally ridiculous batteries. The good news is that they aren't terribly expensive for what you get.
So if you really need monster runtime, head over to DealExtreme and get yo'self this eight-cell battery (white version here), or even this ten-cell behemoth (unavailable in white, so far as I can see). Users on the EeeUser boards have reported better gains in runtime than they expected, up to an incredible ten hours.
But I didn't need such extreme measures.
For starters, I need my on-the-go computer to be very portable. Carting around a brick of a netbook whose battery weighs more than the computer itself is not my idea of practicality.
I also don't want another battery. Getting another, bigger one in addition to the one I alraedy have would mean either carryng around and using both (impractical) or leaving one to slowly degrade while I use the other (wasteful).
More than anything, I don't need monster runtime. A battery that can run your netbook for ten hours straight is all well and good, but not once in my life have I lacked access to an electric outlet for so long.
(People who regularly take transoceanic flights need not write me to inform me of how useful they find their monster batteries).
What I needed was something like a 50% increase in runtime, so I could watch a full movie with 100% screen brightness during the two-and-a-half-hour-long train trip I routinely make, or do less intensive things for longer during the rare longer trip.
Hacking it
The stock battery of the EeePC is made up of four 18650 cells. Coincidentally, I had two bare 18650 cells in the refrigerator, waiting for me to find a use for them.
What? Don't you buy bare lithium-ion cells for no very good reason?
The four cells in the EeePC's battery are set in a 2s2p configuration: two pairs of parallel-connected cells, with each pair connected in series to the other. This lets the battery have twice the voltage and twice the capacity of a single cell.
Adding two cells is a simple matter of connecting them in parallel to the existing pairs, in order to get a 2s3p configuration (two series-connected groups of three parallel-connected cells each).
The tricky part is accomplishing this without ending up with a battery pack that impedes the computer's portability.
The surgery
The first thing that needs to be done in order to modify a battery is, of course, to open it up. This is often harder than it sounds, because they are practically always held together by glue, not screws. Some brute force is needed to break the glue, but do it carelessly and you'll end up with a warped casing that never goes back together.
I tried to carefully push with a thin flathead screwdriver along the seams to get enough space to insert the screwdriver and lever them apart, but they were too tightly glued. So I broke out the Dremel with the metal saw attachment (a cutting disk would have worked just as well), and cut through one of the angles. Note that you should never do this on a flat part of the battery, otherwise you risk going too deep and nicking a cell. Doing it on an angle is much safer.
I then inserted a wide flathead screwdriver in the cut I obtained, twisted, and with a crack the glue gave. I then slowly and carefully worked with two screwdrivers along the seams, cracking the glue all around the battery, until finally the two halves came apart.
The cells inside were glued to the sides with weak adhesive tape; levering them out let me separate the innards of the battery from the casing.
The two parallel-connected pairs of cells are joined by these two tabs at the positive and negative ends...
Series-connected cells can, due to small differences between each of them, develop different charge levels. If left unchecked, this situation can degenerate to the point where the differences become large enough to damage the health of the pack during discharge. This situation is inherently unsafe, because unhappy lithium cells have been known to catch fire or blow up (though this happens a lot more often with the more sensitive lithium-polymer cells than with lithium-ion ones). Even if they don't do anything as dramatic, their life will be drastically shortened.
Through the balancing tap the circuitry inside the battery keeps track of any differences inbetween the two series-connected elements, and applies separate charging as necessary to equilibrate them. Parallel-connected cells don't need this because the parallel configuration balances itself.
Through the balancing tap the circuitry inside the battery keeps track of any differences inbetween the two series-connected elements, and applies separate charging as necessary to equilibrate them. Parallel-connected cells don't need this because the parallel configuration balances itself.
...and by this central tab, which does the series connection and also provides a balancing tap:
I soldered a wire to each connection between two cells. There's no need to solder straight to the cells; the tabs are much easier to solder to, so I just soldered the wires in their middle. The two main terminals need thicker wire than the balancing tap.
The next problem was to let these wires outside in such a way that they didn't foul up the insides of the battery, making it impossible to close it properly. To this end, I drilled three small holes in this fashion:
Note that the casing is too narrow for the wires; attempting to close it resulted in the wires getting squeezed and the casing never properly closing and looking as it was going to burst. To prevent this, I carved a passage for each wire in the sides of the casing with the dremel:
The plastic is very thin there, so it's possible to end up seeing on the other side. This is not a problem.
I threaded the wires through the holes, carefully inspected the two halves of the casing for bent tabs, plastic debris and/or leftover glue, and closed the battery. Some glue is needed to hold it together; cyanoacrilate or two-part epoxy (stronger) work well, but melt glue doesn't as it's ill suited for this task. I could have spread glue all along the seam, but I instead chose to only apply it in a few spots. This way if it ever becomes necessary to re-cell the battery I'll be able to open it back up without too much trouble. I then clamped the battery in my bench vise and let it sit there for a while to let the glue cure.
The battery was now ready to accept more cells. I put it in the EeePC and charged it to 100%; this was necessary to insure no voltage mismatch with the new cells.
I got my two 18650 cells, applied some solder to their terminals, charged them fully (important to avoid the charged cells in the battery to overload them) and then joined them in series with a short wire (I used the same wire size I used on the main terminals of the battery). I then cut and stripped some of the insulation in the middle of this wire to act as the balancing tap.
Next I glued the cells to the casing. The gluing process needs two stages; for now I just needed to set the cells in the correct position (low enough that they didn't foul the screen up, not so low that the computer rested on them) and keep them in place as I soldered the wires, so I used two dabs of melt glue on each end of each cell.
Once the glue was hardened and the cells were solidly in place, I trimmed the wires coming out of the battery, then stripped them. It's important not to screw this up: had I cut a wire too short it'd have caused me significant pain, as I'd have had to reopen the battery and resolder another wire or lengthen the existing one with another solder joint.
I soldered the end wires to the cell terminals, then insulated the connections with a layer of melt glue. I then soldered the balancing wire to the exposed part of the wire connecting the two new cells, tucked the connection down and drowned it in more melt glue.
I could just have used melt glue on everything, and it'd have probably worked acceptably well; however, since my EeePC gets thrown in bags and tossed around all the time, I wanted something more powerful. So I used silicone. Not any silicone will do, mind you; you need to look for the stuff that releases small amounts of acetic acid while curing (read the instructions on the tube to find out if it's the right one). I wanted to use transparent silicone, but since that wasn't available at the local store and the supermarket had a discount on grey one, I ended up using that.
I made sure everything was clean, then (using a silicone tube gun) applied a generous amount of the stuff where the cells contact the plastic. Silicone has a curing time of several hours at least, but it's preferable to leave siliconated parts alone for a whole day before using them. I gave the silicone ample time to do its thing.
The result is, while not aesthetically pleasing, functional and quite tough.
Conclusions
With this mod I achieved the desired result: the EeePC genuinely does last about 50% longer (I don't have the patience to take proper stopwatch tests), it's not much heavier and the expense was risible. The only weird thing I've noticed is that sometimes if I charge it fully and then immediately use it, it'll report a battery status of 90%. I can only assume that the status circuitry inside the battery gets a bit confused by the added capacity and doesn't report the charge level with complete reliability. This does not affect runtimes, so I consider it a very minor inconvenience.
And as for toughness, well, three days after completing the mod I was fumbling around with something while holding the EeePC and I dropped it from chest height on a concrete floor. It hit exactly on one of the new cells. The fall didn't dent the cell itself: the impact was absorbed by the silicone, and the only thing that broke was some of the outer sleeve on the cell in question. A small bit of electrical tape fixed it, and the computer has been running fine ever since. It's also perfectly possible to grab it by the battery with no trouble at all.
If you're in the position of wanting a longer lasting EeePC without having to deal with multiple batteries, I heartily recommend you do this too. It's almost certainly doable even on the batteries of the later models (incompatible with the 701's), as the technique is exactly the same.
No comments for this article
 EeePC battery hack